Friday, February 7, 2020

Are You worried about roaming users? - Enterprise Security

Using the Zscaler App, users can get all of the benefits of the Zscaler service for Internet traffic, as well as granular, policy-based access to internal resources from a single point.
    
Ø  With the app's Internet Security feature, you can protect your users' web traffic even when they are outside your corporate network. The app forwards user traffic to the Zscaler service and ensures that your organization's security and access policies are enforced wherever they might be accessing the Internet.

Ø  With Zscaler Private Access (ZPA), you can enable your users to securely access enterprise applications from outside the corporate network. ZPA establishes a secure transport for accessing your enterprise apps and services.

Ø  Zscaler App will enable us to enhance the endpoint security of road warriors, mobile users with enhanced control and visibility

     
Installation Procedure of Z-App :

Ø  Download the latest version of application for suitable OS (windows, Mac)


Ø  Sign with the credentials your organization domain ID.

Example: exaple@org.com

      >    Please select  “Zscaler” as Cloud , depends on your organization selected 

Ø  Accept the “domain” sign in policy.

Ø  Automatically your device will be provisioned once you accept the “Org ” Policies.

Ø  Done with registration of device and Installation of Z-App in Desktop.


Z-App Cloud Console Administration Configurations:

Below is the Screenshot of Z-App Administration Tab.

Ø  Zscaler app store is to know the latest update versions and current update settings:


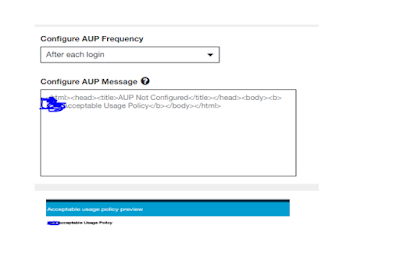
Ø  Zscaler App notification Tab used to configure Notification message appears at when user or
Admin try to provision new device. [<b> text to show </b>]


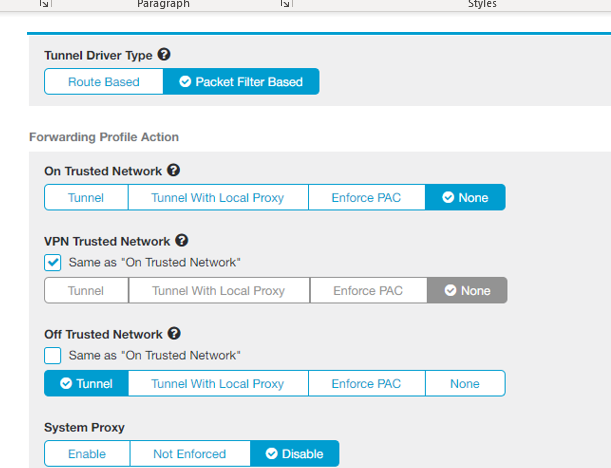
Forwarding Profile :

Ø  Forwarding profile is used to identify the Zscaler App to identify the traffic to where to forward via Tunnel.

Ø  One organization can have multiple forwarding profiles to different Users to different destinations as per company requirements.

Example:
While forwarding the profile to Zscaler App we taking consideration DNS entries, VPN tunnel IP-address, and DNS search domains as below .

Forward Profile name
DNS –Server names/IP-address
DNS-search names
Laptop
List of your internal Domain IP's to identify the traffic to choose forward profile  
example1.com
example.2com


Network Identification criteria:

1.       Trusted network:
Ø  User is inside the corporate network.
2.       VPN Trusted network:
Ø  User is outside network and connected via cisco client VPN.

3.       Off-Trusted network:
Ø  User is outside the corporate network using any other external network

Note:  As per our current configuration Zscaler app work status will active only on “off-trusted “network as above.
               We can modify the working procedure of Zapp configuration accordingly as per requirement.


Ø  Current Zscaler App configured to off-trusted network functionality with PAC file enforcement for specific URL’s Bypass methodology.

Ø  That PAC file will be configured in forwarding profile when traffic is identify by Zscaler App then fetch conditions from Custom PAC configuration and redirect the users accordingly.

Ø  You can see this PAC file configuration in below location.


Zscaler Admin portal -> Administration->Hosted PAC file.


Here is the sample configuration for PAC file:
App-Profile:

Ø  Zscaler app profile used for user to restrict web-traffic based on policy configured for that forwarded profile.

Ø  When user network is identified in forwarded profile, Zscaler App looks for the app profile download and work accordingly configured rules for that app profile.


ZApp Road Worries Policy  :

Accorrding to your wish you can configure the policies for URL & Application category .

Basic Policy recommended as below.


Note :  (Mobile Security is also possible tuning the forwarding profile configuaration) 


Wednesday, February 5, 2020

Web Parameter Tampering attack

The Web Parameter Tampering attack is based on the manipulation of parameters exchanged between client and server in order to modify application data, such as user credentials and permissions, price and quantity of products, etc. Usually, this information is stored in cookies, hidden form fields, or URL Query Strings, and is used to increase application functionality and control.
This attack can be performed by a malicious user who wants to exploit the application for their own benefit, or an attacker who wishes to attack a third-person using a Man-in-the-middle attack. In both cases, tools likes Webscarab and Paros proxy are mostly used.
The attack success depends on integrity and logic validation mechanism errors, and its exploitation can result in other consequences including XSSSQL Injection, file inclusion, and path disclosure attacks.

Impact :  Cost Impact on purchasing the products online .

How it can done:

1. look for the vulnerable website where there is data tampering is possible


2.Configure the Burp proxy to intercept the traffic between client and server 
3.i have choose something as below screen shot which cost 750*2=1500 

4.I know price parameter is vulnerable so i manipulated i changed to 1 Rupee only i selected quantity as 2 so i get the selected product only for 2 Rupees

5. Then i have forwarded the request with manipulated parameter , booom that was reflected         in response and able to see the changes .


Happy Hacking :-)

Thursday, November 28, 2019

Do you know CSRF attack ? Lets Understand Together

What is CSRF attack ? ✊


Cross-Site Request Forgery (CSRF) is an attack that forces an end user to execute unwanted actions on a web application in which they're currently authenticated. CSRF attacks specifically target state-changing requests, not theft of data, since the attacker has no way to see the response to the forged request. With a little help of social engineering (such as sending a link via email or chat), an attacker may trick the users of a web application into executing actions of the attacker's choosing. If the victim is a normal user, a successful CSRF attack can force the user to perform state changing requests like transferring funds, changing their email address, and so forth. If the victim is an administrative account, CSRF can compromise the entire web application.

Image result for csrf


Impact : Stealing Password / Changing credentials existing logged user 


 How it will be done?


 1. I am simulating this scenario in my internal Lab setup.

 2. I have already setup which is vulnerable to CSRF( cross site scripting request forgery )


3.First create the  New user , i have created for testing purpose as  username raj and password as test@xxxx


4.Try to login with created account, remember this user password was test@xxx


5.Now test that web app is really vulnerable for XSS attacks , i found by simple script that it was vulnerable to XSS reflected attack.


6. Now we know webapplication is vulnerable and target the user whom we want to attack.

Note : User must be already logged in that webapplication

7.Now i am writing simple java script that will be executed from browser end and executes when ever user click on it.

<form action="http://192.168.56.103/bWAPP/csrf_1.php" method="GET">
        
        <p><label for="password_new">New password:</label><br />
        <input type="password" id="password_new" name="password_new" value="nasagoni"></p>

        <p><label for="password_conf">Re-type new password:</label><br />
        <input type="password" id="password_conf"  name="password_conf" value="nasagoni"></p>            <button type="submit" name="action" value="change">Change</button>   

    </form>

8.Send the above link to targeted user .(in values feild keep which password you want to keep )


9. Thats all when ever user click it will be redirected to our script page executes , now user password gets changed (as you kept in user value feild)

10. See below screen says password get changed


11.Now you can  do chnages to Raj  account , transfer money if it a bank application :-)
12👐👐✊✊✊✊.Hope you now familiar with this attack

Happy Hacking :0

Sunday, November 24, 2019

OSSEC-HIDS


OSSEC-HIDS 

[open source security -Host Intrusion Detection System]

Introduction :


OSSEC is a platform to monitor and control your systems. It mixes together all the aspects of HIDS (host-based intrusion detection), log monitoring, and Security Incident Management (SIM)/Security Information and Event Management (SIEM) together in a simple, powerful, and open source solution.


The following operating systems are supported by the OSSEC agent:

• GNU/Linux (all distributions, including RHEL, Ubuntu, Slackware, Debian, etc)
• Windows XP, 2003, Vista, 2008, 2012
• VMWare ESX 3.0,3.5 (including CIS checks)
• FreeBSD (all current versions)
• OpenBSD (all current versions)
• NetBSD (all current versions)
• Solaris 2.7, 2.8, 2.9 and 10
• AIX 5.2 and 5.3

Key Benefits:


Compliance Requirements

OSSEC helps customers meet specific compliance requirements such as PCI and HIPAA. It lets customers detect and alert on unauthorized file system modifications and malicious behaviour embedded in the log files of commercial products as well as custom applications. For PCI, it covers the sections of file integrity monitoring (PCI 11.5, 10.5), log inspection and monitoring (section 10), and policy enforcement/checking

Multi-platform:

OSSEC lets customers implement a comprehensive host  based intrusion detection system with fine grained application/server specific policies across multiple platforms such as Linux, Solaris, Windows, and Mac OS X

Real-time and Configurable Alerts:

OSSEC lets customers configure incidents they want to be alerted on, and lets them focus on raising the priority of critical incidents over the regular noise on any system. Integration with smtp, sms, and syslog allows customers to be on top of alerts by sending them to e-mail enabled devices. Active response options to block an attack immediately are also available

Integration with current infrastructure:

OSSEC will integrate with current investments from customers such as SIM/SEM (Security Incident Management/Security Events Management) products for centralized reporting and correlation of events.

Example : currently routing to  as below architecture Splunk

Key Features

File Integrity checking :

There is one thing in common to any attack to your networks and computers: they change your systems in some way. The goal of file integrity checking (or FIM - file integrity monitoring) is to detect these changes and alert you when they happen. It can be an attack, or a misuse by an employee or even a typo by an admin, any file, directory or registry change will be alerted to you.

Log Monitoring

Your operating system wants to speak to you, but do you know how to listen? Every operating system, application, and device on your network generate logs (events) to let you know what is happening. OSSEC collects, analyzes and correlates these logs to let you know if something suspicious is happening (attack, misuse, errors, etc). Do you want to know when an application is installed on your client box? Or when someone changes a rule in your firewall? By monitoring your logs, OSSEC will notify you.

Rootkit detection :

Criminal hackers want to hide their actions, but using rootkit detection you can be notified when the system is modified in a way common to rootkits. Active response Active response allows OSSEC to take immediate action when specified alerts are triggered. This may prevent an incident from spreading before an administrator can take action.

OSSEC Architecture :

Manager (server)
Manager (or Server) The manager is the central piece of the OSSEC deployment. It stores the file integrity checking databases, the logs, events, and system auditing entries. All the rules, decoders, and major configuration options are stored centrally in the manager; making it easy to administer even a large number of agents.

Agent

Agents The agent is a small program, or collection of programs, installed on the systems to be monitored. The agent will collect information and forward it to the manager for analysis and correlation. Some information is collected in real time, others periodically. It has a very small memory and CPU footprint by default, not affecting the system’s usage. Agent security: It runs with a low privilege user (generally created during the installation) and inside a chroot jail isolated from the system. Most of the agent configuration can be pushed from the manager.

Agent -less

Agentless For systems that an agent cannot be installed on, the agentless support may allow integrity checks to be performed. Agentless scans can be used to monitor firewalls, routers, and even Unix systems

Functions of each module ?

Work-flow :                                                                                                            

Internal Architecture :


File Directory Structure as below :

Description
Location of file

Installed at
/var/ossec

Main Configuration file
/var/ossec/etc/ossec.conf

Decoders stored at
/var/ossec/etc/decorders.xml

Binaries at
/Var/ossec/bin

Rules stored at
/var/ossec/rules/*.xml

Alerts
/var/ossec/logs/alerts.log

Agent Components
Syscheckd
File integrity
Rootcheckd
Malware and rootkits detection
Agentd
Forwards data to the server
Logcollectord
Read logs (Syslogs,wmi, flat files)
Server Components
Remoted
Receives data
Analysid
Process data
Monitord
Monitor agents


Installation Procedure of  OSSEC-HIDS:

On Ubuntu you will need the build-essential package in order to compile and install OSSEC. To install the package run the following command.
# apt-get install build-essential
If database support is needed mysql-dev or postgresql-dev should be installed. Run the following command to install these packages
# apt-get install mysql-dev postgresql-dev

Installation of server package :
Installation of OSSEC HIDS is very simple, the install.sh shell script automating most of it. There are a few questions to be answered before the installation will occur, one of the most important being which type of installation is desired. It is important to choose the correct installation type: server, agent, local, or hybrid.

1. Download the latest version and verify its checksum

# wget -U ossec  http://www.ossec.net/files/ossec-hids-2.8.1.tar.gz       //Server package//

# wget -U ossec  http://www.ossec.net/files/ossec-hids-2.8.1-checksum.txt  //verify hash value//


  2.  Extract the compressed package and the run the file (install.sh)

# tar -zxvf ossec-hids-*.tar.gz (or gunzip -d; tar -xvf)
# cd ossec-hids-*
# ./install.sh

Note :  Usually installed files will be present in   /home/InfoSec/


Step by step by configuration of server :

1.       What kind of installation do you want    :Server
2.       Where to install the OSSEC HIDS : at     /var/ossec
3.       Email notification (Yes /No) -Yes ,  
4.       Do you want to run integrity check daemon ? (Yes/No) : Yes
5.       Root kit detection engine (Yes/No) : Yes
6.       Active response allows : (Yes/No): 


Installing GUI :

1.       Download the package from  https://github.com/ossec/ossec-wui/archive/v0.8.tar.gz
2.       Extract to Desktop : # cd  /home/infosec/
                                  
                                    # tar xvf  v0.8.tar.gz

3.       Move extracted file (ossec-wui-0.8 ) to
                                 
 # mv   /home/infosec/ossec-wui-0.8   /var/www/html/

4.       Navigate to ossec-wui-0.8 directory and run setup.sh
1.       Try to install check apache2 server status by below command
                                 Service apache2  status | restart | start 

Configuration check if any problem troubleshoot as below 

#Cd /var/www/html/ossec-wui-0.8
#Chmod 770 tmp/
#Chgrp www-data tmp/
#apachectl restart
#service apache2 start
#usermod  -a -G ossec www-data
#apachectl restart
To get logs into desired location please run this command:
Cd /var/ossec/bin/
/var/ossec/bin/ossec-control enable client-syslog


Try to access Web-GUI via browser:


The etc/ossec.conf has 6 sections:
• global (global);
• rules (rules);
• syscheck (syscheck/rootcheck);
• alerts (alert);
• active-response (command/active-response);
•      * collector (localfile

Agent Installation on windows:

1.       Download the agent package from below link https://updates.atomicorp.com/channels/atomic/windows/ossec-agent-win32-3.1.0 5696.exe
2.       Install as normal package
      
3.      Run as administrator
4.      You see page as below
5.      Provide server IP as : xxxx
6.      Copy key from ossec-HIDS server and save restart.
Adding Agent on OSSEC-HIDS server & Extraction of Key :

   Goto below directory as below :
/var/osssec/bin/manage_agents
2choose A to add agent as below
cchoose E to extract key and paste the key to associated agent .

   *   If communication has not done kindly check logs at agent side located in path :

C:\Program Files (x86)\ossec-agent\ossec

If successfully connected you see logs as below :


Note : You must allow 1514 port from firewall if server and agent in different network
You check Alerts in below location :
#Cd /var/ossec/logs/alerts/
#nano  alerts.log


Conclusion:


OSSEC Reports On :


·        Common Web attack detections
·        XSS attempts
·        SQL injections
·        Windows authentication failure attempts
·        MySQL authentication attempt failed   detections
·        PostgreSQL authentication attempts failed detections
·        SonicWALL authentication attempt failed detections
·        RDP attempts failed detections
·        SSH service authentication attempts failed
·       Login authentication failed detections